Thankfully, there are some common troubleshooting methods you can try to resolve the issue. If the Windows 10 Explorer keeps crashing, you may be able to fix the problem by following the steps below.
Run System File Checker
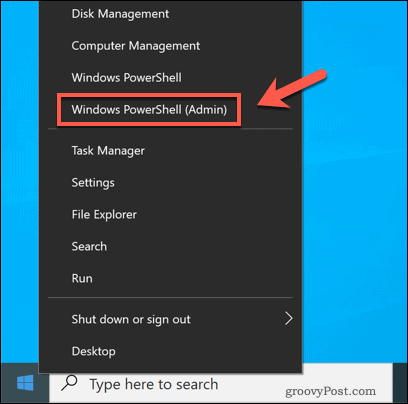
When File Explorer keeps crashing, missing or corrupt files are among the most common causes. To check for (and repair) any missing or corrupt system files, you can run the System File Checker tool (SFC) using the Windows PowerShell. To open a new PowerShell window, right-click the Start menu and press the Windows PowerShell (Admin) option.
In the new PowerShell window, type sfc /scannow, then press the Enter key.
The SFC tool will take some time to scan your PC for file errors. If it detects any (and where possible to do so), Windows will repair and replace the files, ensuring the overall integrity of your Windows installation.
Check for Windows System Updates
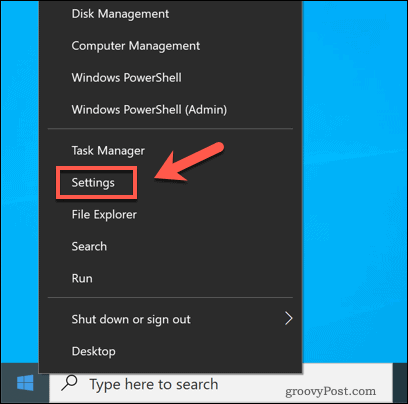
Rather than issue new major Windows releases (like Windows 7 or Windows XP), Microsoft shifted to a service release model with the release of Windows 10. Minor updates containing bug and security fixes are issued regularly, while major releases containing new features are issued twice a year. If your PC is out of date, you’ll need to check for new system updates. To do this, right-click the Start menu and press Settings.
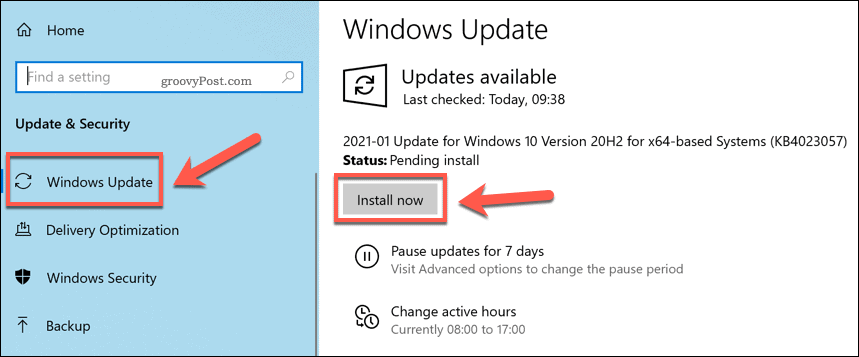
In the Settings menu, press Update & Security > Windows Update. If there are any pending updates, press Install Now, otherwise press Check for Updates to search for any available updates.
Once Windows downloads any available updates, restart your PC to install them. While this isn’t a miracle fix for a crashing Explorer process, new updates come with bug fixes and stability improvements that could resolve the issue.
Separate File Explorer Processes
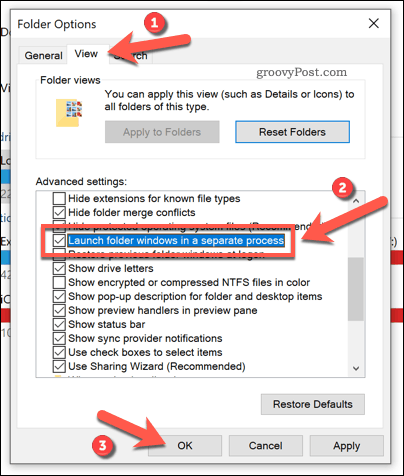
The Explorer process usually runs as a single process on your PC. That means that each new File Explorer window that opens is placed together into a single system process. This can cause some stability issues, especially for slower PCs. To help overcome this issue, you can change this setting to split each new File Explorer window into a separate process. To do this, open File Explorer and press File > Change folder and search options or File > Options (depending on your current view).
In the Folder Options window, press the View tab. In the Advanced settings window, press the Launch folder windows in a separate process checkbox to enable the feature. Click OK to save and apply the setting.
With this setting applied, each new window opened in File Explorer will run under its own separate process. Should a single folder window become unstable, this setting should help to prevent Explorer from crashing entirely.
Disable Third-Party Explorer Extensions Using ShellExView
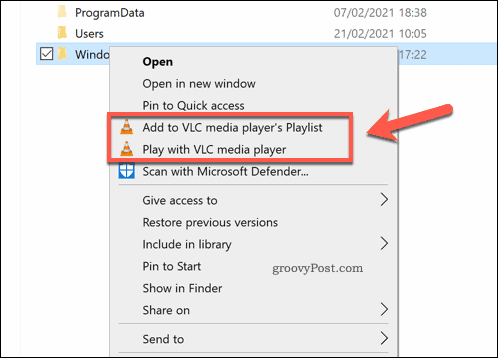
Windows File Explorer is customizable, thanks to third-party extensions that extend its functionality. For instance, if you install an app like 7-Zip, you’ll be able to use the app to perform tasks (such as compressing a file) in Explorer itself. If you install VLC, you’ll be able to add files to a playlist, directly from a File Explorer window.
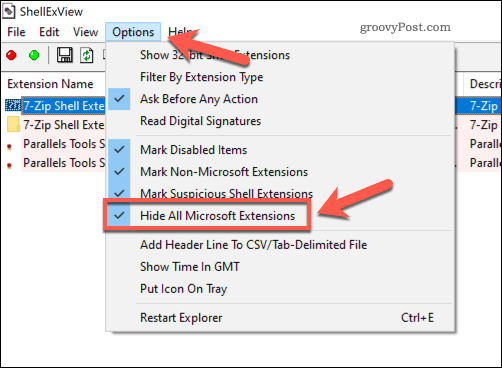
These options are usually visible when you right-click a file. However, should a third-party extension become unstable (or should you have too many extensions installed), it could crash the explorer.exe process. You’ll need to disable the problematic extension to fix the issue. The best way to quickly disable some (or all) Explorer extensions is to use a third-party app called ShellExView. This allows you to quickly see what extensions are installed and disable or remove them. To start, download the ShellExView app and install it. Once installed, run the app and allow it to scan for any extensions. The list will include Microsoft’s own extensions, so press Options > Hide All Microsoft Extensions to ensure you don’t disable these, as this could break File Explorer.
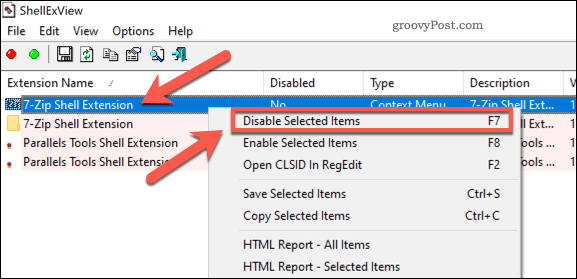
Hiding Microsoft extensions from the list will display any third-party extensions installed. To disable an individual extension, right-click it, then press Disable Selected Items.
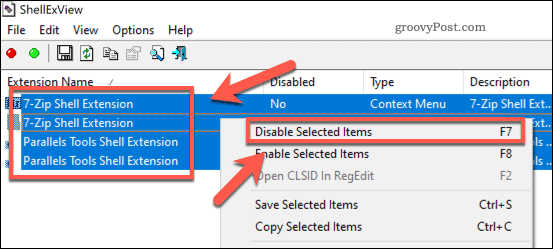
To disable all the third-party extensions, press Edit > Select All or press Ctrl + A on your keyboard. With the items selected, right-click the entries, then press Disable Selected Items.
With the items disabled, close ShellExView and restart your PC. You should no longer see them when you right-click files in File Explorer, but you may need to restart your PC for the changes to take effect.
Check Windows Error Logs
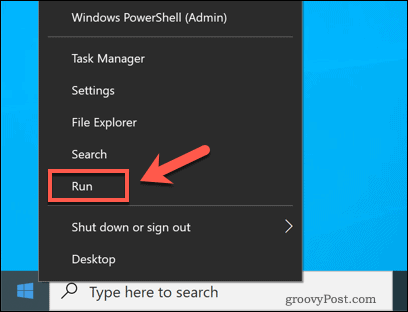
If a specific problem is causing Windows Explorer to keep crashing, you can investigate the cause in Windows’ error logs. To do this, right-click the Start menu and press Run.
In the Run box, type eventvwr and press OK. This will launch the Windows Event Viewer.
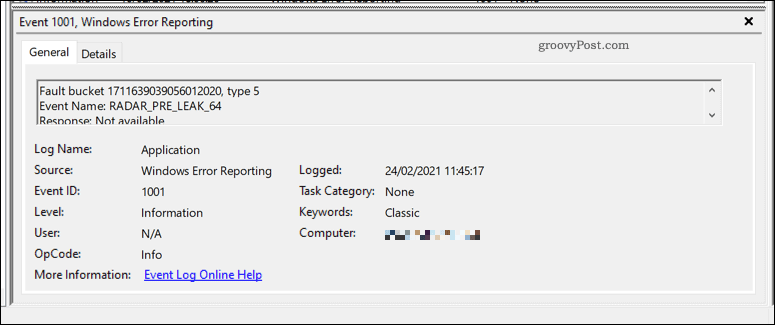
In the Event Viewer window, press Windows Logs > Application in the left-hand menu. In the Application panel on the right, search for Event IDs with the value 1000. Event ID 1000 usually points to an error with the Windows Explorer process.
Once you’ve located a suitable error, select it, then check the General information listed below. This will provide some background on the cause of the issue, which you may need to research and troubleshoot further.
For instance, if a third-party app caused Explorer to crash, this may be listed in the error log, allowing you to locate and remove it to resolve the problem.
Check for Malware
If Windows Explorer keeps crashing and you’re unsure of the cause, you should check for malware. A virus-infected PC isn’t safe to use and could be behind the cause of instability issues like this one. While you can use third-party antivirus software, this isn’t actually necessary. Thanks to Windows Security (previously Windows Defender), you can scan your PC for malware without needing third-party software. To do this, right-click the Start menu and select Run. Type windowsdefender: in the Run box before pressing OK.
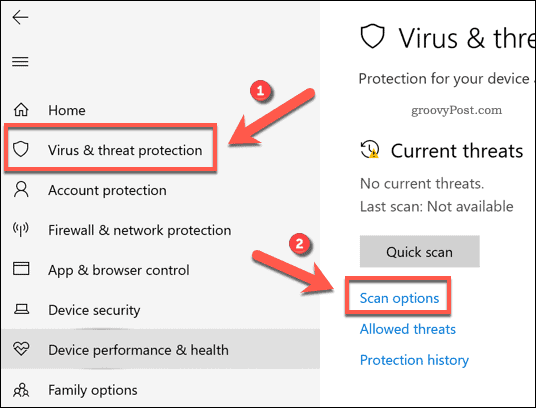
In the new Windows Security window, press Virus & threat protection, then press Scan options.
Select Microsoft Defender Offline scan from the options, then press the Scan Now button.
At this point, Windows will restart and begin a boot-level scan of your PC for malware. If it detects any, Windows Security will attempt to quarantine or remove it. This should help to resolve stability issues with your PC and make it safe to use.
Repairing a Windows 10 Installation
When Windows Explorer keeps crashing, it usually points to a problem with your installation. While you can automate some maintenance tasks, it might be worth generating a performance report to check for any underlying issues. One common issue is broken registry items, so you may need to repair the Windows Registry if this is the case. Sometimes, only a clean break can fix a broken PC. If that’s the case, you’ll need to reinstall Windows 10 and start again with a fresh installation. You can also reset your installation to restore Windows system files to their default state while leaving your personal files intact.
![]()

