Don’t let the low version number throw you, however, Snagit for Mac is every bit as full-featured and intuitive as Snagit 10 for Windows. Those of you who are new to Snagit will be well rewarded for investing $49.95 USD into this product. But Mac/Windows users like myself who received a free license for Snagit for Mac along with their Snagit 10 purchase will have some minor adjustments to make on the OS X side. Anyway, let me outline the top features before diving into the screenshot tour and review.
Snagit for Mac Key Features:
All-in-one Capture – Snagit for Mac’s capture interface is slick and smart. Grab a screenshot of a window, region, the entire desktop, or even a scrolling window all with a single hotkey.Delay capture – Set up a delay to capture the screen as-is. Handy for capturing menus, contextual menus, splash screens, and other fleeting moments.Attractive call-outs and markup – Snagit’s wide range of customizable arrows, speech bubbles, shape, and highlights bring clarity to your screenshots with a professional look and feel.Effects – Borders, shadows, perspectives, and custom edges give an extra touch of class to your captures. Blur lets you censor appropriate data as well.Sharing – Go from Snagit Editor to iWork, Microsoft Office, and other applications with a simple drag-and-drop. Also has built-in FTP, email, and publishing interfaces.Organization – Stress-free capture tray lets you keep track of recent captures and Auto-Storing gives you peace of mind that all your work is saved and secure.
Sounds pretty standard, I know, but the true joy of working with Snagit is the signature TechSmith ease and intuitiveness that this company infuses in each of its products. Let me show you.
Capturing with Snagit for Mac
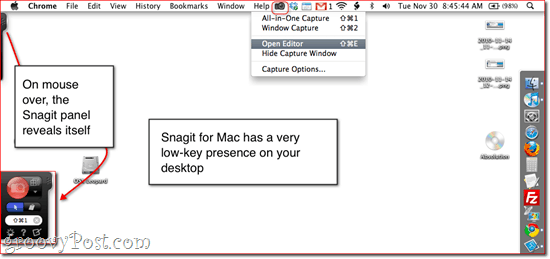
There are two ways to activate the All-in-One Capture with Snagit for Mac. You can either click the red Capture button that hides unobtrusively in the Snagit drawer on your desktop or uses the global hotkey. For convenience sake, I set my global hotkey to Shift-Command-1, thereby overriding OS X’s built-in screen capture hotkey.
You can also activate the capture tool by clicking the icon in the status bar at the top of the screen. Either way, when you go into capture mode, all traces of Snagit for Mac skedaddle, leaving you with a clear shot of your desktop. With the All-in-One Capture tool, whatever ends up in the orange box gets captured. For a window capture, simply mouse over the window that you’d like to capture and the tool automatically sticks to the edges. You can also have the window capture focus on a certain pane of a window or even an element on a web page. Click once to capture the window or pane. For a custom region capture, click and drag to draw a box. When you start slowing down, Snagit magnifies where the crosshairs intersect, which lets you get your screenshot tight, right down to the pixel. It also keeps track of dimensions for you.
Scrolling capture is a truly revolutionary feature. This lets you grab the entire contents of a web page or window, even if it can’t fit on the screen all at once. To activate scrolling capture, start your window at the top/left-hand corner of the page and click one of the arrows.
This is a very groovy feature. Check out the result by clicking the thumbnail next to the above screenshot. (Note: Unfortunately, scrolling capture doesn’t currently work on some applications. Namely, Google Chrome.) Delay capture can be activated by clicking the Settings icon (looks like a gear). Here, you can check Delay capture and choose the length of your delay. Now, when you hit the Capture button or the global hotkey, it’ll capture freeze the screen after your pre-set delay. You’ll see a countdown in the bottom-right of the screen. Once the countdown expires, you can capture a region, window, or the full screen.
While we’re here, you’ll also notice that you can choose to include the pointer in the screenshot and/or send the screenshot to the clipboard right away, where you can paste it into whichever application you choose. If you capture the mouse pointer, it gets incorporated into the screenshot as a separate element, allowing you to move it, resize it or remove it as you see fit. Pretty simple, huh? But that’s not the best part. Snagit Editor is a treat in itself. Check it out:
Snagit Editor for Mac
I love Snagit Editor. I love it so much that I use it to edit screenshots and images that I didn’t even capture with Snagit.
For those of you who are coming from the Windows version of Snagit, you’ll immediately notice that everything is rearranged. But don’t worry—almost all of it’s still there. Let me show you around. (And yes, I am now using Snagit to capture screenshots of Snagit Editor wherein I have screenshots of Snagit open. I’ll give you a moment to regain your grip on reality.)
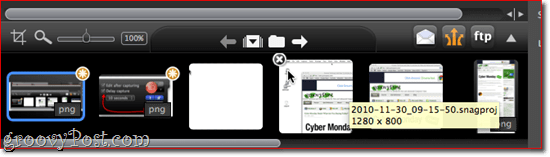
Your screenshots get put into the Snagit Editor tray right when you capture them (if you have Edit after capturing selected) and you can quickly switch between the ones you want to edit. You can also drag and drop images into the tray if you want to edit something that wasn’t captured with Snagit. The tray keeps a set amount of recent captures, but you can remove ones you don’t need by clicking the X in the top-left of the thumbnail. The Snagit Editor tray is one of those quiet triumphs that I really appreciate. It makes the workflow very simple—I usually go through and take all the screenshots I want for a given blog post at once. Then, I go back and remove the ones I don’t need, and before marking up the ones I do need in sequential order. As you can see, Snagit Editor marks the screenshots with unsaved changes with an Asterisk, which is a handy reminder. The real stars of the show that you’ll see in the final product are the various call-outs and effects. To start, you can crop, resize, and merge screenshots using layers and transparencies. You can also add text boxes and speech bubbles, arrows, stamps (things like stars, checkmarks, and other icons that come pre-loaded), free-hand drawings with the pen tool, highlights, lines, and shapes (rectangles, rounded rectangles, and ellipses). I won’t walk you through each and every one of these—but there’s a lot of potentials here since each tool can be deeply customized in the Properties panel. Arrows, for instance, can be curved by dragging the points once you’ve drawn them (this varies from the Windows version, where there’s a separate bendy arrow style) and you can customize the ends, make the lines dotted, and/or change the color and thickness of the arrow. Likewise, text boxes and shapes can be customized in terms of their outline, fill, and font. All elements can be given shadows with customizable perspectives and length. But for the most part, you’ll probably stick to the pre-set styles, of which there are many. Oddly, the pre-set styles on Snagit for Mac are a bit different from Snagit 10 for Windows, but you can save your custom styles by clicking the Add button in the right-hand panel after making changes. From there, you can Export your styles from the Edit menu if you want to stay consistent across machines or co-workers. The other tab in Snagit Editor is the Effects tab, which lets you add Edges, Borders, Shadow, Perspective, and Reflection. You can apply these features or remove them by selecting them and tweak their properties by clicking the Gear icon next to each. As with the tools, you can add styles to save you time. For example, here at groovyPost.com, we have a certain width and style for our borders and shadows, and preset styles go a long way towards keeping things consistent.
Snagit for Mac Samples
If you are a frequent groovyPost.com reader, then you’ve already seen what can be done with these tools. If not, then why haven’t you subscribed yet? Let me show you how with a screenshot that incorporates many of the Snagit Editor for Mac features:
Here, you’re seeing three kinds of text boxes, a rounded rectangle around the Join Us button, highlighting (around “Enter your e-mail”), freehand beneath the blurred text, and a bendy arrow with a dotted line. The whole thing has Edges, Border, Shadow, Perspective, Reflection applied to it as well. Groovy, huh?
Sharing and Exporting Snagit Screen Captures
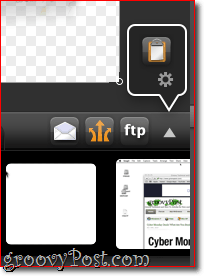
By default, Snagit for Mac uses .snagproj, TechSmith’s proprietary format, which retains all the elements and layers so you can go back and edit them. But for sharing, publishing, and incorporating into blog posts, you’ll obviously want to get your screenshots out of Snagit for Mac. You can do so by saving them as a PNG, JPG, TIFF, GIF, or BMP, which is the most portable method of exporting your screen capture. But the fastest way to go from an annotated screenshot to blog post is to copy and paste the entire screenshot. There is a Copy All button hiding along the bottom of the screen which you can reveal by clicking the arrow. You can make this button more prominent by going into Snagit > Preferences > Outputs and swapping the Copy All button for one of the defaults.
Anyway, this will put the image onto your clipboard, where you can then paste it into any application which supports multimedia items from the clipboard. iWork and Microsoft Office products work well with this, but web-based apps won’t (such as Google Docs). Here, you can see I’m posting a screenshot right into TextEdit.
You can also upload your images directly via FTP, or to your Screencast.com account, or automatically attach them to a Mail or Microsoft Entourage email. Personally, I’ve never found a need for this.
Conclusion
Did I miss anything? Probably—there’s a lot to discover in Snagit for Mac, but even if you haven’t mastered all the subtle details, you can still create professional-looking screen captures that go far beyond what you can do with free tools. Even if you have a professional image editing suite on your computer, I’d highly recommend using Snagit for Mac because it’s streamlined for screen capture editing. It’ll save you time and the end product will look totally slick. In comparing this to the Windows version, I did notice some glaring differences. I’m not sure why they made it so different from the Windows experience—it’s almost as if the two development teams were given the same feature sets as goals, but only loose instructions for how to incorporate them. Simple things like the dedicated panel for copying and pasting, resizing, and other commonly used actions were relegated to obscure menus on the Mac version, which is an inconvenience, but not a game-changer. Some features even seem to be improved on the Mac version—the perspective feature, which looks pixelated and ultimately useless on the PC version, is smooth in Snagit for Mac. The way they handle the curved arrows is better in Snagit for Mac as well. Other facets—such as how fonts and text styles are handled—were obviously changed to suit the OS X environment and provide familiarity, which I can’t complain about. Still, some features are either so deeply buried that I cannot find them or they are simply nonexistent. I can’t find the spotlight feature or the watermark feature in Snagit for Mac, and at this juncture, I’m going to have to assume they aren’t there. Snagit 10 also has some basic video capture capabilities, which Snagit for Mac does not, but if you’re going to go that route, you may as well just spring for Camtasia Studio. Overall, though, I’m thankful that Snagit for Mac has arrived. There’s no other screen capture tool I’d rather use, regardless of what platform I’m on. It’s well worth the $49.95 USD if you take screenshots with any regularity. And for those on the fence, there’s a 30-day free trial that lets you use all of the features—so give it a whirl! The HELP PDF has no INDEX or Table of Contents so I am going through trying to figure out basics. Since I have PARALLELS on this computer, I want to use it in WINDOWS as well. I think most info relates to the PC so I am having a bit of a time with the this help. Q – How can I delete images in the tray? They are junk and I was practicing with the software. Q. I believe the QUICK LAUNCH and TABS refer to WINDOWS, is that correct? I would welcome a MANUAL that I can quickly thumb though, do you have any suggestions? Thanks Comment Name * Email *
Δ Save my name and email and send me emails as new comments are made to this post.


![]()
