The policy tools are very powerful and dangerous therefore today we’re going to review the simple step-by-step example of setting the password policy for accounts created on a Windows 7 PC.
Step 1 – Managing Password Option on a Local Account.
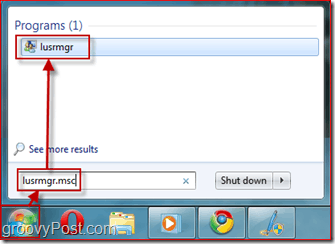
Although you can set the password policy on accounts, did you know you can also manage passwords on other local accounts using the Local Users and Groups admin tool? Let’s go in and take a look at the settings real quickly. First, let’s open the Local Users and Group Admin Tool – Open the Start menu and type in lusrmgr.msc and hit Enter.
Step 2 – Selecting Which User must Change His/Her Password at Next Logon
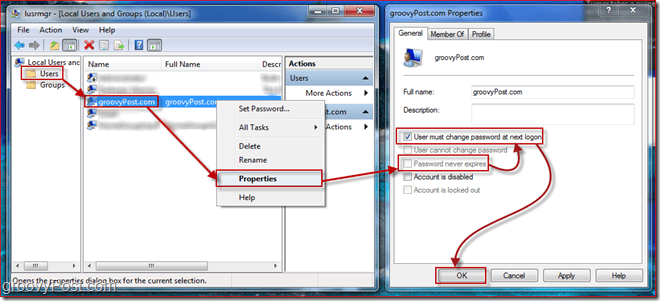
Select the Users folder to get a list of all local accounts on your Windows 7 PC. Click the User account and Right-Clicking on it to pull up the context menu. Select Properties. A new window will appear showing the available settings for the user. First Uncheck Password never expires, and then Check User must change password at next logon. Next, Click OK.
The settings in there are relatively self-explanatory. Now that the password will expire and the user must change their password at next login we need to configure some details about a password, like password length. To do this, we need to open up the Security Policy editor for Windows 7.
Step 3 – Opening the Security Policies Manager
Click the Start menu button again and Type in secpol.msc and hit Enter.
Step 4 – Managing the Security Policies – Minimum Password Length
Let’s set the security policy to enable a minimum password length to be ten characters. To do so, in the left pane Expand the Account Policies menu and Click Password Policy. Now Select a policy you want to edit by Right-clicking on it and Selecting Properties. In my example, I’m going to set the Password length to 10 characters. You can also configure other things like max password age but were going to leave that to the default 42 days.
Step 5 – Policy Application
The password policies you entered only apply to the user passwords that expire. If you want to check which users have passwords that don’t expire, go back to lusrmgr.msc (Step 1 above) and take a look at the various accounts. Let’s take a look at the user experience for the user we required change their password at next login.
Step 6 – User Must Change Password at Login
As you can see, as the user tries to log on, he is prompted to change his password (configured this in Step 2 above.)
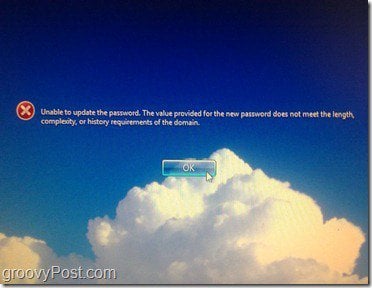
Now we’ll enter a short password to demonstrate the effect of the Minimum Password Length Policy from Step 4:
Just as expected, we receive an error message that the password does not meet the required length. Now we’ll enter a password that meets the length policy and attempt to change it:
This time, since the password met all password requirements, we can change it, and we get a dialog box indicating that the password change is successful. After pressing OK, the user will log in and not be required to change their password again for 42 days (unless you set it to something different in Step 4.)
Conclusion
This article just scratches the surfaces regarding the kinds of things you can control with on a Windows computer using Local and Group and Security Policies. Feel free to poke around and play with some of the other settings. My only warning is BE CAREFUL. Read very carefully before changing any of the policies as some policies can result in unexpected outcomes. I’ve personally made a change before that locked me out of my own computer! Wifes laptop is running Win 7 home premium 64 bit and I need to access the Local Security Policy. It does not appear in control panel and secpol.msc does not work so how do you change the settings? Comment Name * Email *
Δ Save my name and email and send me emails as new comments are made to this post.


