Dictation in Microsoft Office
Turning on the dictation option in Office is as easy as a button click. On the Home tab in Word or PowerPoint, on desktop or online, click Dictate in the Voice section on the far right of the ribbon.
In Outlook, you’ll see the Dictate button on the right side of the ribbon when composing, replying to, or forwarding an email as well as when creating a new event in Outlook Calendar.
Use Dictation
After clicking the Dictate button:
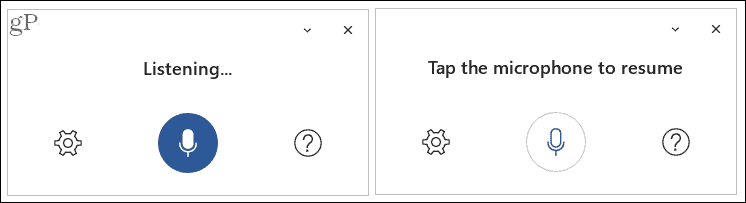
Start speaking immediately to dictate your words. You’ll see the small Dictation Toolbar appear.To pause, click the microphone icon in the toolbar and then again to resume. You can also use the command “pause dictation” and then click the icon to resume.To stop, click the X to exit dictation and close the toolbar or use the command “exit dictation.”
Adjust the Dictation Settings
You can adjust a few helpful settings for your dictation. Click the Dictation Settings (gear) icon in the Dictation Toolbar. From there, you can choose a different language, enable automatic punctuation, and turn on a profanity filter.
Supported Dictation Languages
Microsoft currently supports variations of English, Chinese, French, German, Italian, and Spanish. Other languages with limited support include Danish, Japanese, Polish, Portuguese, Russian, and several more with others being added over time. By default, the dictation feature is set to your Microsoft Office document language.
Helpful Commands
When you’re composing a document, slideshow, or email, it’s not all about the words. You may need to add a bold font, include a special character, delete a word, or create a list. You can use dictation commands to take care of items like this as well. Here are several common commands. Add punctuation: Say the name of the punctuation such as “period,” “comma,” “left bracket,” “right bracket,” “hyphen,” or “colon.” Include symbols or characters: Just like adding punctuation, simply say what you want to add. Try things like “percent sign,” “minus sign,” “degree symbol,” “caret symbol,” dollar sign,” or “smiley face.” Delete: To delete the last spoken item or one before the cursor, just say “delete.” You can also use “delete last [number] words or sentences” or “delete [word or phrase].” Format text: You can use bold, italics, underline, strikethrough, and similar font formatting. After dictating the word or sentence, follow it with the formatting you want to use. For example, you could say “the water was cool and blue,” “bold blue.” This would then format the word “blue” in bold font. You can also use commands like “underline the last word” or “italicize the last sentence.” Create lists: If you want a bullet or numbered list, simply create one with “start bullet list” or “start numbered list”. After dictating a list item, say “next line” to add another. When you finish, use the command “exit list”. If you would like help at any time while dictating, just say “show help” or click the question mark in the Dictation Toolbar. And for a complete list of commands, check out the Microsoft Support page for Using Dictation.
Dictation in Microsoft Office Turns Your Speech Into Text
Enabling dictation is easy enough in Microsoft Office and if you find that you like to mix dictating and typing, you can do that too. Give your fingers a rest and see what you think of the dictation feature in Office! For more, take a look at how Google voice typing works if you use Google Docs for document creation too. Comment Name * Email *
Δ Save my name and email and send me emails as new comments are made to this post.


![]()
