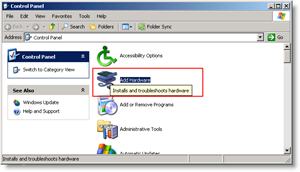
After searching through several Microsoft Virtual PC documents, configuring my VMs to use the wireless adapter at first started to look impossible. The problem I ran into was attempting to connect a Virtual Machine (Guest) using a physical Wireless Adapter that is also being used by the physical machine or Host. Each time I tried it, I ran into a duplicate IP address issue.
2. The Add Hardware Wizard will pop-up. Click Next.
3. Check the Yes, I have already connected the hardware button, then Click Next.
4. Now Scroll DOWN to the bottom and Click Add new hardware device. Tip: You can get to it faster by hitting the A key once.
5. Now Click the Install the hardware that I manually select from a list (Advanced) button, then Click Next.
6. Click Network adapters from the list. Click Next.
7. On the left side Click Microsoft, on the right side Click Microsoft Loopback Adapter. Now Click Next.
On the next Screen Click Finished. Now to set up Internet Connection Sharing (ICS)
- Browse to your Network Connections, Right-Click your Physical Adapter, and Click Properties.
2. Click the Advanced tab, then Check the Allow other network users to connect through this computer’s internet connection button. Click OK to finish.
3. Now Open up your Virtual Machine’s settings, and Set its Network Connection to Use your new Microsoft Loopback Adapter. All done! Your virtual machine should now be able to connect to your network/Internet using the Loopback adapter and your Wireless Network connection! Granted, this one is a bit complicated, so any comments for the How-To is welcome. However, please post any detailed questions to the groovy Community Forum. Thx very much for such a good work Ilija —»>Click the Advanced tab, then Check the Allow other network users to connect through this computer’s internet connection button. Click OK to finish.«<— I am using Vista and when I tick the box I have to ‘Select a private network connection’ of either Local Area Connection or Local Area Connection 2. Neither work. Help with the above please. Second problem is.. 3. Now Open up your Virtual Machine’s settings, and Set its Network Connection to Use your new Microsoft Loopback Adapter. A bit more information on how to do this please. For the solution to your second problem, in Virtual PC go to File > Settings and change the physical network card that your virtual machine will use to the loopback adapter. If you are still having problems, make sure you installed the loopback adapter properly. “The limitation in this however is that the loopback adapter will bind the IP address of your Virtual Machine to 192.168.0.1, and it may interfere with any workgroups you have running on your network. If it does interfere, you can manually change your network to a 192.168.1.xxx subnet.” not sure how sure how to do that. thanks -mike i had small doubt, for how many loopback interface’s we can share the internet. I have tried giving more than two interface. i loosing the connectivity for existing loopback interfaces. Is there any restrictions for sharing the internet b/w the loopback adapters. If yes how many interfaces we can give. Kindly advice Comment Name * Email *
Δ Save my name and email and send me emails as new comments are made to this post.


