Resize Images in Microsoft Office Documents
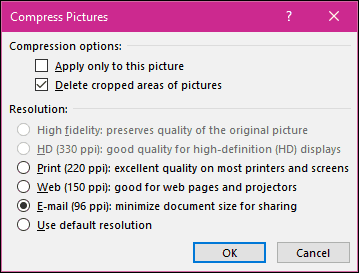
Launch Microsoft Word and insert your images. Select a picture, then click the Format context tab that appears. Then Click Compress Pictures within the Adjust group.
Choose the Email radio box, which will automatically reduce the size of the document making it easier for sharing. You can apply this option to select images in the document or all. The Compress Pictures offers other options for different scenarios such as Print and the Web.
As you can see below, the same Word document went from 2 MBs to under 200 KBs.
Resizing images manually can also reduce the size of your documents. Select the picture and use the anchor to resize it. This option is perfect for long documents or presentations with lots of illustrations. You can still deliver your message without compromising the quality of your essential and relevant documents.
That’s all there is to it! Now you’ll be able to share image filled documents without having to compress them in a separate app first. Speaking of resizing email attachments, check out our article on how to resize large image attachments in Outlook. Comment Name * Email *
Δ Save my name and email and send me emails as new comments are made to this post.


![]()
